How to Effortlessly Switch to Linux: Step-by-Step Guide
Why Switch to Linux?
Linux isn’t just for tech wizards—it’s a powerful, open-source operating system that prioritizes privacy, customization, and stability. Unlike Windows or macOS, Linux doesn’t track your activity or force you into proprietary ecosystems. It’s free to use, modify, and share, backed by a global community of developers. Whether you’re a privacy-conscious user, a tinkerer, or someone tired of bloated software, Linux offers a refreshing alternative.
You might say that you still want to play your favorite games. The good news is that you can! Many popular games are now available on Linux, and with tools like Proton, you can enjoy a wide range of games that were once exclusive to Windows. If you want to learn more about playing your favorite games on Linux, read our article here.
Choosing Your Linux Distribution
With hundreds of distributions (or “distros”) available, picking the right one can feel overwhelming. Here’s a quick breakdown:
- Debian-based distros (e.g., Ubuntu, Linux Mint) are ideal for beginners due to their stability and extensive software libraries.
- Arch-based distros (e.g., Manjaro) cater to users who want bleeding-edge software and deeper customization.
- Fedora or openSUSE strike a balance between innovation and reliability.
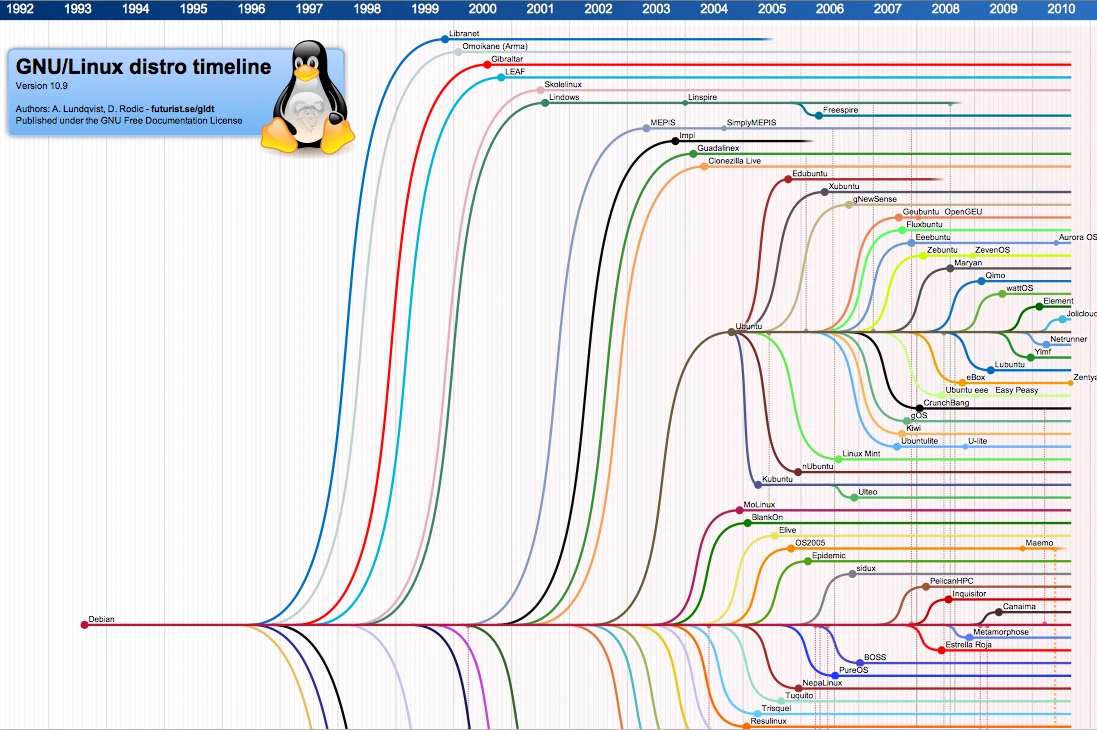
For most newcomers, we recommend Debian—the rock-solid foundation for many popular distros, as you can see on the chart below. Once you’ve chosen a distro, decide on a desktop environment:
- GNOME: Sleek, modern, and intuitive (similar to macOS).
- KDE Plasma: Highly customizable with a Windows-like feel.
- XFCE or LXQt: Lightweight options for older hardware.

Getting Comfortable with Linux
Before wiping your hard drive, test Linux risk-free in a virtual machine (VM). Tools like VirtualBox let you run Linux alongside your current OS. Here’s how:
- Download a Linux ISO (e.g., Debian or Ubuntu).
- Install VirtualBox and create a new VM, allocating resources like RAM and storage.
- Boot the VM from the ISO and install it through the “Graphical Install” option.
Making the Switch: What to Expect
Many fear Linux is all about typing commands in a terminal. While the terminal is powerful, modern distros offer user-friendly Graphical User Interfaces (GUI) for everyday tasks like browsing, editing files, or installing software.
Dual Booting: The Best of Both Worlds
Need Windows or macOS for specific apps or work? Dual booting lets you keep both Operating Systems on one machine.
- Single-drive setup: Partition your drive to allocate space for Linux.
- Multi-drive setup: Install Linux on a separate drive for easier management.
Preparing for Installation
Before installing Linux, gather these essentials:
- A USB drive (8GB+ recommended) for the installer.
- An external drive to back up critical files.
Installing Debian: Step-by-Step Guide
Step 1: Download the Correct Debian ISO
Visit Debian’s download page and select under the “Small CDs or USB sticks” header:
- amd64: For most 64-bit Intel/AMD systems.
- arm64: For newer ARM-based devices (e.g., Raspberry Pi 4).
- i386: For older 32-bit machines (rare today).
Step 2: Create a Bootable USB
For Windows
- Install Rufus (download here).
- Plug in your USB drive and open Rufus.
- Select the Debian ISO you downloaded.
- Make sure the partition scheme is set to MBR and the target system is BIOS or UEFI.
- Click Start and wait for the process to complete.
For macOS
- Open Terminal.
- Use the
diskutilcommand to list your drives:diskutil list - Unmount the USB drive (replace
diskNwith your USB drive number):diskutil unmountDisk /dev/diskN - Use the
ddcommand to create the bootable USB (replacepath/to/debian.isoanddiskNaccordingly):sudo dd if=path/to/debian.iso of=/dev/rdiskN bs=1m - Wait for the process to complete, then eject the USB drive:
diskutil eject /dev/diskN
Step 3: Boot from the USB
- Restart your computer and press the BIOS/UEFI key (commonly F2, F12, Del, or Esc).
- In the boot menu, prioritize the USB drive.
- Save changes and exit to launch the Debian installer.
Step 4: Install Debian
- Select Graphical Install for a guided setup.
- Follow prompts for language, location, and user account creation.
- When it prompts you about Partitioning you have the following options:
Guided - use entire disk: Erases the entire disk and installs Debian as the sole operating system. Ideal for new users or dedicated Linux setups.
Guided - use entire disk and set up encrypted LVM: Installs Debian as the sole OS while enabling full-disk encryption via LVM (Logical Volume Manager). Perfect for securing sensitive data.
Manual: For advanced users: Create, resize, or retain partitions (e.g., dual-boot with Windows). Requires familiarity with disk layouts.
- When it prompts you about Software Selection: Choose the desktop environment you want (GNOME or KDE Plasma) and optional tools (e.g., SSH server, print server).
- Complete the installation and reboot.

